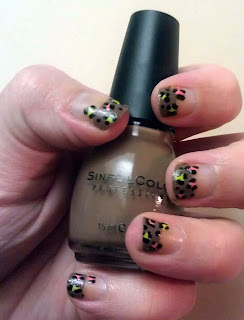
OK, so the "water marbling" rage was not all that recent, but I've been spending a lot of time trying to get it right!
This picture is from when I tried water marbling, got frustrated, and finished with non-standard water marbling. I'll explain in a bit. Can you guess which finger was done with regular, from-the-tutorial, water marbling?
Give up? It was my ring finger. Can you even tell the difference?
Water Marbling:
You can find tutorials all over the net. Water marbling capitalizes on the surface tension of water and the density of nail polish. The summary is that you get a bowl of warm water, and drop nail-polish in the center. Each drop is supposed to spread to the edges of the bowl. You make concentric circles with 3 or so colors and then use a toothpick to make little swirly designs. You press your fingernail into the pattern you made, swirl up the extra paint with a swab or tooth pick, clean up the edges of your finger and poof! Water marbled. Then you repeat for the other 9 fingers.
I figured out that instead of putting the swirled paint directly on your nail, you can cut a piece of ziploc bag and press the paint on that instead. Once it dries, you can peel the paint off and stick it to your nail (after painting your nail with white and letting it dry just until it's lightly tacky). Saved me loads of time; the one nail I did without this took me 15 min to get right.
Why I dislike "Water Marbling"
1. It takes for-freaking-ever. Most of the time you spend marbling will be on researching nail polishes that work or just doing trial and error. Plus, you have to re-do the paint circle swirly thing for every nail.
2. It's messy. You can protect your finger with masking tape, scotch tape, or white glue, but it still requires a lot of clean-up.
3. It doesn't work with all paints. Paints that dry too fast create a thin film on the water's surface and the next droplet will refuse to spread out. Also, glitter polishes don't work; they usually sink.
4. It wastes polish. Even not counting the trial and error part, many tutorials will use 5 drops or so of each color.
Dry Marbling:
Then there's this thing called "dry marbling." You get a piece of parchment paper or plastic bag and thickly paint stripes with several colors of polish. Drag a toothpick straight across and get that marbled look. When it is thoroughly dry, you can peel it off and press it on tacky nails. I like this, however, the paint doesn't always come up the way I want it to come up from the paper. It also wastes a bit of polish.
Here's my solution!
I did neither method! Maybe I'm just lazy, but I found the fastest way to achieve a good look. (I understand that other people probably thought of this way before I did, but just let me have my moment.) What do you think about how this turned out?
 |
| "Dragonfire" nails |
This is what I did.
Materials: Toothpick, 3 colors of polish, and acetone/swab for clean-up
1. Glob rows of each color on your nail. Yes, "glob." It needs to be thick, especially at the base of the nail. You don't need to be super speedy either. Go slow enough to not be sloppy.
2. Starting from the base of the nail, drag the tip of the toothpick toward the tip of your nail in a wavy line.
3. Use the toothpick to scrape along the side of the nail to remove extra paint while it's wet.
4. Let dry thoroughly. I waited a good 10 min before doing the other hand.
5. Use the swab to clean up anywhere you got too excited with polish.
and lastly,
6. Use the extra time that you would have spent doing some other method of marbling to enrich your life. Ponder the images or lack of images on your wall. Write a short poem. Go say hi to your boyfriend (or girlfriend), who misses you during "don't come within 20 feet of me when I'm painting my nails" time. Whatever you do, those precious minutes are yours now. Enjoy :)


.jpg)
.jpg)
.jpg)
.jpg)
.jpg)


